Monday, September 9, 2013

Ribs and the waiting game

The interesting thing about this kayak is that there are no drawings for plans by which I mean highly technical ones with a fine pencil, more lines than kayak and incredibly small numbers. It's all based off of your body for measurements like the arm span is three arm spans, so start off your gun'l's at that length minus a foot and a half or the paddle is your armspan plus the distance from your elbow to your fingertips (a cubit). So instead of referring to drawing all the way along, you create this as you go along, shaping it with your eyes and brain as you massage it into existence.

This being said, a byproduct is that you can't work ahead of yourself. You can't measure out the ribs before you have a deck to measure them for. You can't do that until you've taken the time to create a deck that is at once has visually appealing curves as well as trying to make it a sleek, swift, wave-riding machine that can also cut through the dawn's still water in the silence. So you might be able to imagine how this journey evolves in the mind and slowly takes over your thoughts. At work I think about the journeys I'll take as well as the next design steps in line. This also forces a slower build and makes you work at the kayak's pace.

Since the last blog post, I have measured the ribs of the finished deck, cut them and prepared them bending. This process involves soaking them for three to four days and I am currently 24 hours into that step. I have had time to make the bending jig, cut out the pieces for the steamboxes and clean up the badly neglected workshop in this time. It's a nice little calm before the fairly intensive session of steam-building to come! More time to devote to dreaming up the rest
of the kayak!


This is me after I measured out the ribs (beam across gun's plus a fist and a half for me) and made temporary ones of wire to figured out the kayak's depth. I am sitting in it checking out how it will feel here. I was pretty stoked on it right away, the foot rest sitting at a perfect height with room to rest and just touch the foot beam and the back rest at the same time. It feels great relaxed but tight enough to brace against the backrest, thighbeam/massik (to be created) and the footbeam in a moment noticed, quite a necessary thing in hairy water AKA the fun stuff.

I'm not really sure yet what perspective I'm writing this blog from. I don't want to be too involved in the technical side because if you want the details, buy the book, it's cheap and better than I could ever be on a blog for that. If you want to know more about it from me, we can talk about that outside the blogosphere, I'd be happy to talk, share and learn! I really appreciate the Greenland community feel, which has already helped me along so much in my progress here. So this blog is becoming more of a technical bulletin for people who want to see a layman's progress in a fun project with insights into the journey involved. I hope I've been able to hint at the joy involved in creation in this post. Here's a picture of a beautifully satisfying lash.



Thursday, September 5, 2013

Shape!

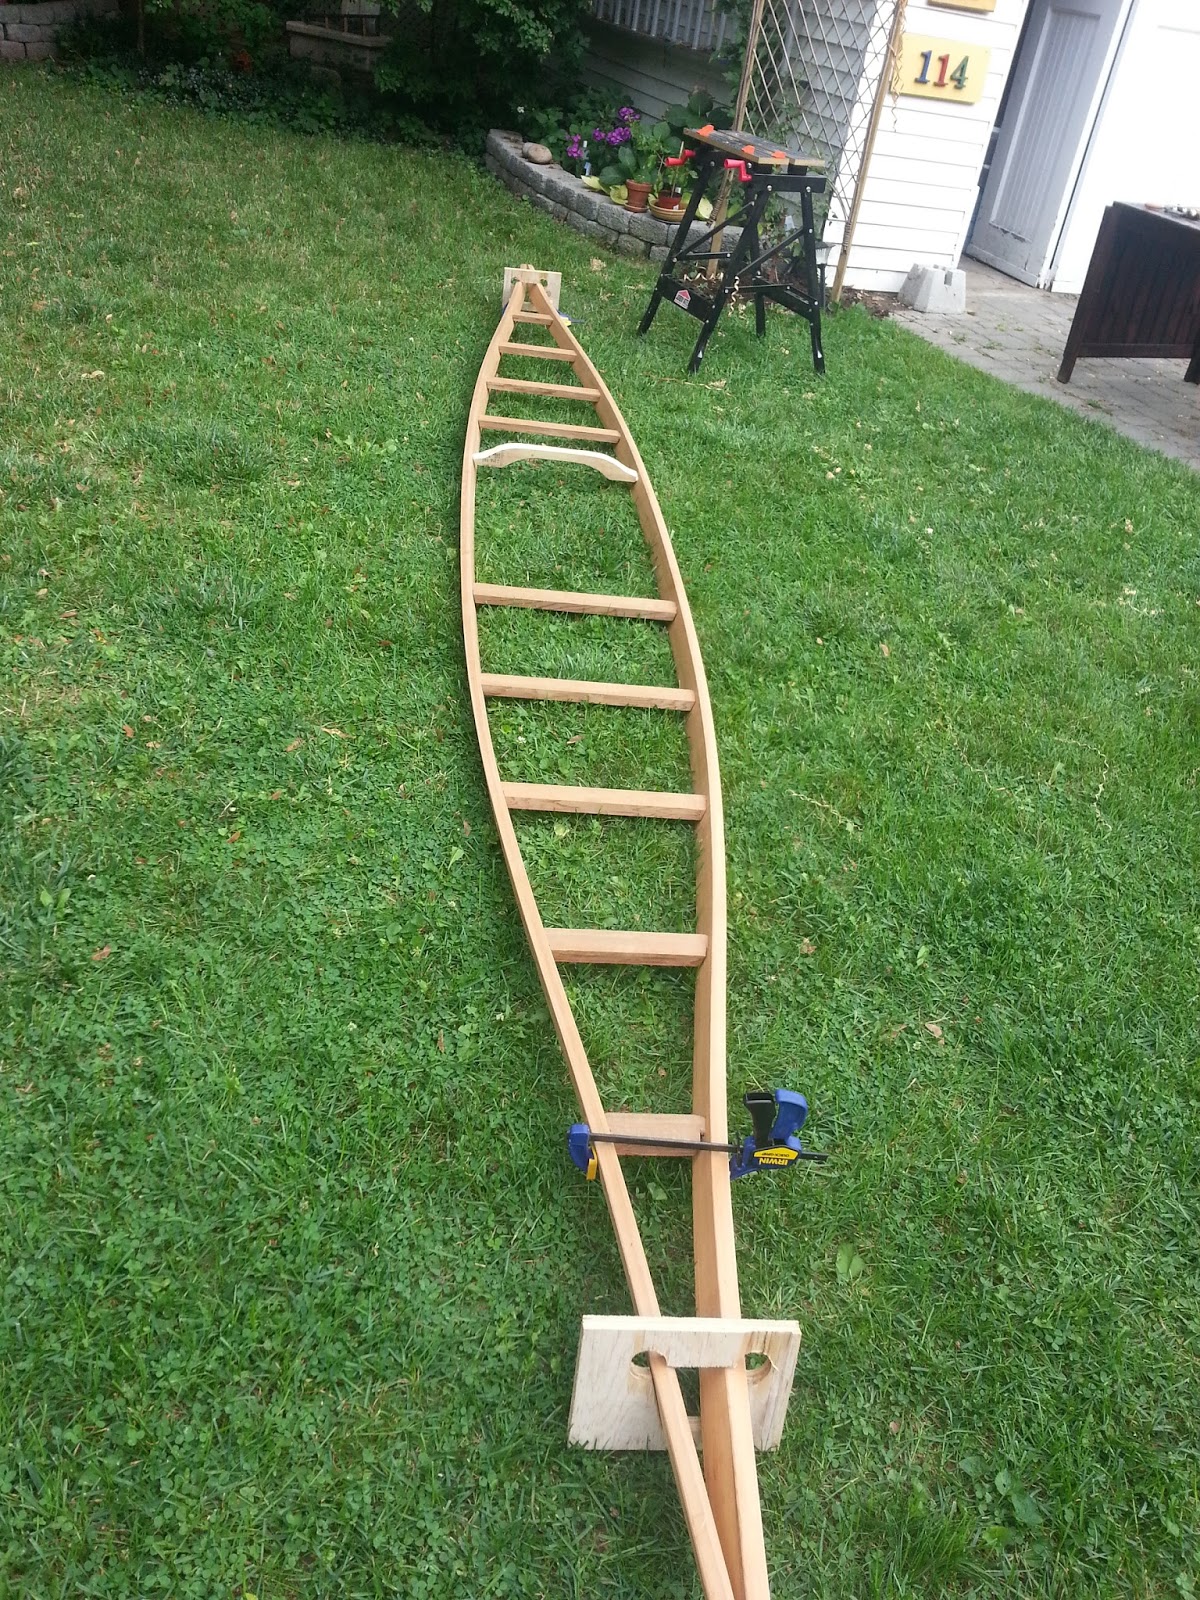
Aloha friends, much has happened and more is about to happen! I have finally put the top deck together, lashing it together with trunnels and all. After much precision work and planing and humming and hawing, I put all the deck beams in one gun'l, and then worked the other gun'l on to it, bending it all into shape and holding it in place with clamps and the end forms before I lashed it all together. Sighting down the center only proved quickly that taking my time had paid off and she seemed as true as true can be!

 It was a very rewarding part of the build, finally being able to see part of the finished product and knowing that it's not going to come undone again. It's only going to get better looking from here on out, hopefully.

It was also a fairly meditative process as well as learning and using some new techniques. I used the Eskimo slipknot (I don't know if that's a racist term here or knot) a two types of lashing that were very similar. Both involve a hole in each piece of wood you're lashing together, be it gun'l to gun'l or gun'l to beam, a series of loops between the two, and hitches to tighten it by compressing the two legs of the loop. Using artifical sinew and clamps to hold the shape, I'm quite confident that the sinew will hold and not stretch for a long time.
Here you can see trunnels, or what's left of them. These are 3/8th dowels that I sawed down the middle of, leaving about 3/8th in the middle, so that it had slotted ends. Put that in a hole through both gunnels, then tap in a wedge of wood to hold shape on each side and boom, you got an old school fastening device working it's magic. The next one is further down so that it goes through different grain and doesn't weaken the first one.
 In this photo you can see that just down from the trunnels is the first lash put in, which held the whole deck together with little strain. The trunnels main purpose I think is to hold the tips together very precisely, because holding the tips perfectly flush is the easiest way to have a symmetrical kayak. I also redid this lash here later, to bring the ends together tighter and make for a quicker craft, hopefully.
Here you can see the lashings on a deck beam. There are ten or twelve of these right now in addition to the end lashings and trunnels which I believe is going to give me plenty of strength and worry-free deck as I move on to the ribs soon.


Shaping up to a real beaut!

Thursday, August 29, 2013

Deck Beams and a Paddle!

I've finally finished fitting all the deck beams to their mortises, each one a custom whittling job to get it down to a snug fit. It is a task like most around this kayak, it's not particularly hard or skilled work, it merely takes time and attention to whatever it is that your doing. Keep in mind when reading this blog that this is the first time that I've ever attempted any sort of wood working project that didn't involve 2x4's and a nail gun or a chainsaw. If I can do it, you can do it. So be encouraged, make your own, and come paddle!

The deck beams are now snug and theoretically, should all be correctly angled and fit beautifully into the gun'l's and allow it to hold its shape while I work on the rest of the boat. I'm excited for this next step because it will be a solid unit and something quite beautiful to look at in itself. It also seems like smooth sailing after this but that might just be in my novice mind. The book does say that getting the deck fitted and straight and true is the most difficult part of the project and almost impossible to fix after the fact. I've taken great care and gone slow because of this. When I first put the gun'l's together in their forms (which I have yet to mention) with clamps keeping their ends perfectly match and great care making sure the forms were square I sighted down the middle with some mid-marks drawn and I was a dead on! Just today I got the final pieces of dowel need to keep the bow together once formed so soon I shall get on with this and start having some more impressive photos.

On another note, my paddle is finished already! I went to Frontenac and saw Tom Froese of tandjpaddles.com for a one on one workshop and he guided me through a wonderful four hours of carving cedar up into a nice traditional unshouldered paddle. He cut out the basic shape with a bandsaw or jigsaw and marked lines on it to shave in between and showed me how to use the drawknife, plane and spokeshave and how to work the grain properly in a piece of cedar. This was especially useful to me because cedar is the main wood of the boat as well. I've used the lessons many time over already! At the end of the workshop I had a nice looking paddle that needed its final sanding and a finishing. These pictures here show it after three coats of tung oil and a coat of wax, both of which I got from shop.skinboats.com, a store based out of Anacortes, WA. I like these (not that I've used anything else) because they are super organic and eco-friendly. This is really nice because then you don't have to worry about harming your garden, cats, or yourself when applying the product. It's a little peace of mind after working with industrial products all day! Anyways, the oil helps preserve the wood and really brings out the grain beautifully as you can see while the wax is an added security factor as well as making it slide better in your hands and feel much more sealed and protected from the elements.

Some of you may be confused by the shape of the paddle here as it is not like "Euro" paddles at all. One key difference is the blade shape, it is long and narrow, only about 3.5-4 inches wide on this one. This helps it move more easily through the water for long distance paddling as well as being pushed around by the wind less. You can also shift it from one end to the other in your hands, which greatly helps in rolling to get added leverage. Another difference is the hand position, standard hand position is only shoulder width apart, not the euro way of about elbow width apart. Combined with no feathering, where euro standard is about 30, this makes for a lower and longer stroke, a lot easier to keep up on long distance trips. Aside from that it is very similar to the euro stroke, using your torso more than arms and such. This paddle also feels so light in my hands, I can't wait to get it out on the water.


note: not for the apples!


Monday, August 26, 2013

Making the gunwales

The first thing to do is to make the gunwales. The ribs and deck beams both directly attach through mortise and tenon joints to the gunwales so they must be the strongest pieces in the boat. They also require the most precision and care. I had to make sure that they were matched correctly for stiffness and curves. Each piece is naturally more limber when bent one way instead of the other and can also have natural curves in  a couple directions. Since I got both of my gun'l's from the same piece of wood, I had very little to worry about.

Once I had them properly matched, I lined them up as best I could to each other and clamped them together firmly. This way I could plane down the edges and trim them to exact length. I could also shape the ends this way and keep them identical through some fairly fluid design. Since they'll be held at a 73 degree angle once in kayak form, a cut at a complementary angle is taken from the ends starting at the halfway mark and heading to the bottom of the board. Then, to give the lines a little sweeter look around the bow and stern, a shallow curves was planes out in the last 70 inches on each side, maxing out at half an inch. As you can see in the picture, it's still quite noticeable.

Once this is complete, it's time to start on the mortises for the ribs and deck beams. I used a pre-made jig for keeping square on the rib mortises and I had to make one for the deck beams. As mentioned, the gun'l's are on a 73 degree angle and the deck beams are straight, so the holes have to be at a 17 degree angle to counter this. I used a drill with electrical tape to make sure I kept consistent depth through out the rib mortises but the deck beams go right through.

Now the deck beams are ready to be made. For this, first you have to cut them down to length, which is just a rough measure because you have to mark them and cut the tenons in next. This process could use a jig, which I attempted twice but it fell short of adequate both times and I used two combination squares to mark both the top and bottom point at which it should touch the gun'l and on both front and back. After this, I played connect the dots, drew in a one and a quarter inch tenon perpendicular to that line and then played cut within the lines. At first tenon's seemed more daunting than anything else but my first (correctly measured...) beam fit like a bug in a rug! Now I'm pretty much up to speed except for my paddle which will be the next post.


Wednesday, August 21, 2013

What it is

To let people know who haven't nerded out for days of their lives on the interwebs looking at these things, I'll give a brief description of the build and the abilities of the craft I am making. It is a skin-on-frame boat, built on the 4,000 year old design of the Greenland Inuits. It has remained fairly unchanged in the last four millenia and can still outperform many modern boats. The Inuits made theirs out of driftwood and seal skin where I am making mine out of cedar, oak and nylon ballistic fabric.

The design is built around anthropometric measurements. The overall length is thrice the users armspan, it's beam the user's waist plus a fist or two depending on skill level. Before building I sat on a 2x8 on a 1x1 to find my balance point, where I want my footrest beam, thigh beam(masik) and backrest to be as well as where I don't want the steam bent ribs to be, like my bum and heels. From here, I transferred said marks on to the gun'l's and from there could mark all the rest of the deck beams and ribs. All that is left to do is to do it.

The frame is built with two gun'l's, lashed into shape to deck beams with mortise and tenon joints. The ribs are steam bent and attached to the gun'l's and then the keel and two runners go on to define the shape of the hull once the skin is on. There are no nails or screws, everything is lashed together using mortise and tenon's or dowels. This gives some advantages known to many ancient mariners, Inuit, Viking and Celtic alike. A ribbed hull that is lashed can flex to absorb blows from rocks or other objects in the sea and bounce back to shape, where fiberglass or plastic would crack or smash. It can also 'hug' the waves, bending with them instead of being forced around by them, giving them excellent roughwater handling. The finished kayak when I'm done should weigh less than thirty pounds, a similar fiberglass kayak would weight close to seventy pounds. I should be able to put this on my roof rack single handedly no problem. It is also cheaper, I'm spending about $800 on this including shipping from afar, speciality woods and nice tools. I could have saved money but spent more time and effort sourcing the material, and probably gas money too. A store bought kayak of similar performance could cost up to $4000!


Here are some teaser pics and next post I'll actually mention the build process!


Monday, August 19, 2013

Starting off!

I write this post, the very first already quite late in my maiden project. I have already cut the first deck beam and fitted it, following a lengthy procedure of honing the gunwales and an far lengthier of kindling the project in my head and heart and of course research. Most of the research has come through the internet, first seeing greenland rolling video's while a beginner whitewater kayaker and then a extensive look at the different styles of northern inuit qajaqs from Greenlander to the Aleutians. I'm choosing the west Greenland qajaq for several reasons. One, it is the most popular, so there is lots of build journals and books available in print and screen versions. The second, which causes the first probably, is that I believe it is the most aesthetically pleasing form I know. Finally, the design is 4,000 years old but delivers a boat that is virtually unparalled in the buyers market. It is half as light, many times stronger, faster on calm water and a more agile roughwater friend then it's manufactured contemporaries. I'd also like to make an Aleutian Baidarka at some point for their long-hauling ability but first I gotta get in that water!

I was up in the air between doing a workshop which range from medium far to very far away from my current homebase and getting it done quickly, with good guidance and more expensively or buying the book which was cheaper, more personally rewarding and more educational. Well, I got a job which has been going full time, now seven days a week, eight hours a day, so I bought the book and I'm doing it after work, three to five hours a day, in my backyard. So far, it has been very rewarding.

I got the book from the QAJAQUSA website, from their suggestions, it's called "Building the Greenland Kayak" by Christopher Cunnigham. I'm following it about 90-95% and filling out the rest with alternate techniques seen on the internet or my own way of doing things, because I bloody well can.
http://www.abebooks.com/servlet/BookDetailsPL?bi=8533980667&searchurl=an%3Dchristopher%2Bcunningham%26kn%3Dgreenland%2Bkayak

There are numerous more books and plenty of awesome workshops to help you out on your own journey. For workshops, Anders Thygesen seems to be the best on the planet, at least my eyes on the internet get the best impression from his site. Check out his website and his blog. He has great videos, articles on paddling and paddling techniques and a blog chronicling, among other things, his 3000km trip around Norway in his Baidarka and Greenland paddle.
http://kajakkspesialisten.no

I got my wood from a speciality wood supplier nearby. It wasn't cheap, I spent nearly $250 on two pieces of Cedar 1"x6"x20' each, one milled to the gunwales, and a 1"x8"x12' piece of green White Oak. Along with the minimal scap at my disposal and some dowels that I have yet to buy, that should cover the wooden portion of the boat. For the rest, I ordered it online at www.skinboats.com. I got nylon ballistic fabric, 9oz/yd for the skin, tung oil, wax, shockcord and the 2part poly-urethane finish for the skin. I literally just got it while writing this paragraph and I'm so stoked for it! I have (almost) everything now! It wasn't cheap and I might have gotten better prices locally but the one stop shopping while working full-time was stress-free.

So I got all the stuff, now I can build it!