Wednesday, September 18, 2013

Ribs, Stems and a video clip!

I've finally got all the ribs in, most of the wait being due to the soaking period of
the wood. You should bend very wet wood, pretty much fresh out of the ground wood, not the kiln dried stuff you get at Home Depot. And you should soak it so it can be really limber with a good sauna and do whatever yoga you want it to. However, if it's wet, then it does not cut and shape well under the saw. So I have to know which ribs need replacing and hence, time delays all over the place. I don't mind though because there's stuff you can do in the mean time!

Since the last post, I've cut out the keel and the two stringers that define the chines, tapered them and sanded them down. I've cut out bow and stern stem piece that define the cut water to the boat and I've ripped and sanded and started to soak the wood for the cockpit coaming as well as an experimental piece for steambending the masik! For anyone who actually has building experience, please let me know if steam bending a 2.5" x 1 3/16" x 24" piece of oak and using that is a bad idea. Would it be strong enough?

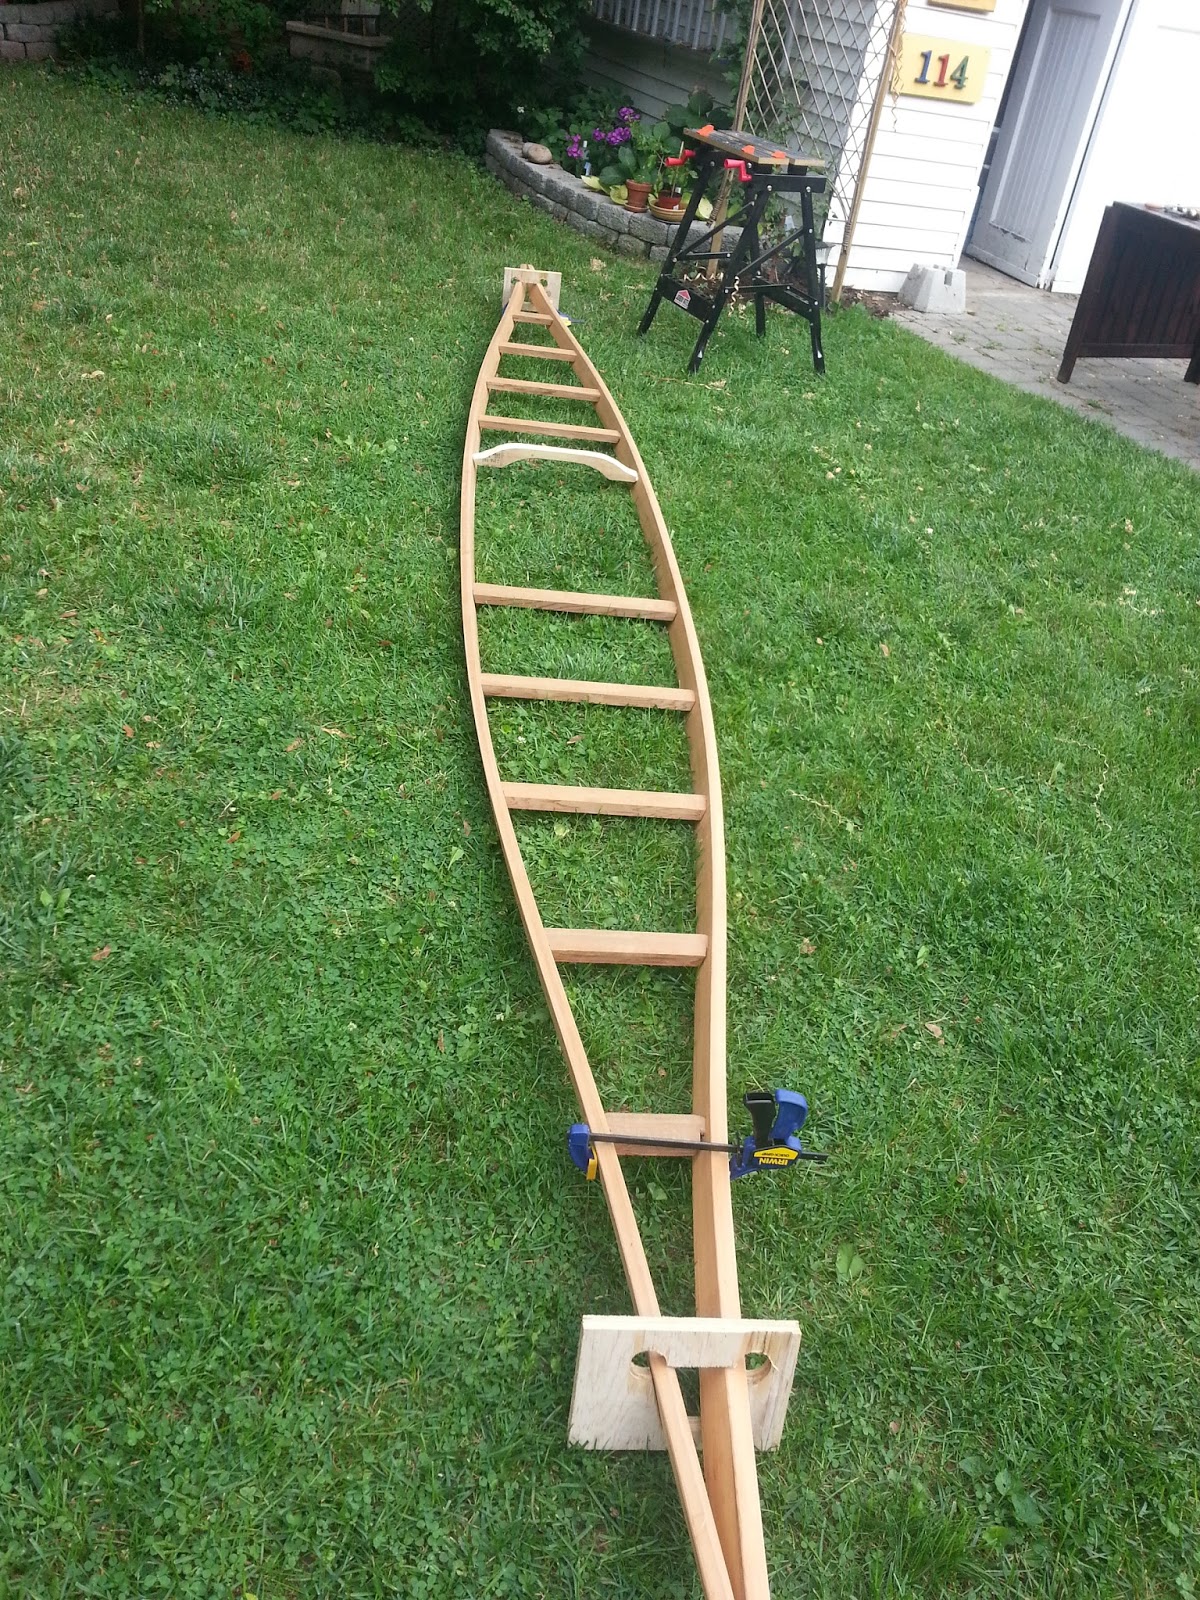
I really enjoyed getting the keel and stem piece done. With them clamped in place you can really see the shape of the kayak jump into being and it's really quite rewarding.

It's also kind of shocking at this point. I've been working steadily on this project for a little less then two months now but it seems like an eternity. And now, with the ribs done and half of the wood for the rest of the boat is cut and ready, it really seems like the end is in sight! I only have to lash the keelson, chines and stem pieces in, bend and place the masik and cockpit coaming, put the deck stringers on, floorboards in and then I can skin it and do the deck lashings after a coating of the good stuff. So pretty much done, right? Knock on wood.


Now, I've thought that this blog should have lots of pictures so people can come in and see how I'm doing without having to read my ramblings or anything. What could make it better, a video of me! Here's a video of me steam bending one of the replacement ribs!

Friday, September 13, 2013

Ribs!

In the past week, since getting the deck in shape, I have cut and soaked all the ribs for four days or more before trying my hand at steam bending. It's always nice to try new things and this was no exception. I made a nice little steam box out of foam board and duct tape with a couple of nails to hold the sides in place and completed it with my campstove, a kettle, a piece of conduit and two towels. I cut a jig out of a 2x6 though all I needed was a 2x4 and used my belt as the strap to bend with.
I feel like I should have gotten a video of the process because it's so amazing to see it happen. Really, just the last minute, of taking it out of the steam box, bending the rib on the jig and then putting it in its place and the final adjustments. It's amazing how pliable wood can become yet the next morning it's almost as stiff as it's ever been. Some quick shaving off some of them revealed that they're still very wet though, so they should get stiffer and stronger!

That all being said, here's what she looks like now! She's a real beaut, with a small rocker to her and a low back deck, she should be good for high winds, stormy seas and calm mornings alike as well as a pleasure to roll. I look forward to meeting her on the water!

Now, you might see that some ribs are still missing here. I broke four ribs in the bending process, fixed one of them with some twine and then broke another two in the fine-tuning. This is actually a lot less then I was expecting so I'm pretty stoked. I already have replacements cut and soaking so Tuesday is the next big bending day!

Here's a really sexy photo, though it probably hides some of the mistakes and bad bends that I have since got back and corrected or tried to. This shows the almost last rib in the stern up front and the rest falling into place. I still have the keel and the two chines to lay which will hold the skin off the ribs but you can already see the beautiful shape of the hull to come. You can also see the mortise for rib 25 which broke before it even left the bending table here.

Here's one of my ingenious fixes to a split rib, twining the hell out of it to hold it together. It's like a tensor bandage from the days of auld. I think I'm going to leave them on unless I get told this is a bad idea from an experienced builder. If any of them read this, please comment.
Here's a split rib, beyond rib-air (soo bad). As I said I was expecting this as you can see under my foot there is two twelve foot sections of oak that could be cut into more ribs. Luckily, I don't even need these and they could even become part of the cockpit. Who knows, I may even do other things than kayaksmithing with them.


So the next steps ahead, after actually completing this one, is to fit the stem pieces on to the end. These will extend the boat another 8 inches in either direction and be the shape of the bow and stern. They will be lashed to the ends of the boat after a little planing and to the keelson, which is the very next step, along with the chines. It seems like there's so many steps but each day when I get home from work and I go to the kitchen  to shovel food in to me, I look out to the backyard and can't think of anything else I'd rather do right now then go work on my baby. Even as the days shrink and I feel the autumn cold kiss my feet, every day I can put in two to four hours, sometimes just fifteen minutes but if I get just one jig or mental problem solved, or even just a clean up, it feel so good. The journey here is its own reward so I am in no rush to get her in the water, especially if it means having something less than an awesome boat.


Monday, September 9, 2013

Ribs and the waiting game

The interesting thing about this kayak is that there are no drawings for plans by which I mean highly technical ones with a fine pencil, more lines than kayak and incredibly small numbers. It's all based off of your body for measurements like the arm span is three arm spans, so start off your gun'l's at that length minus a foot and a half or the paddle is your armspan plus the distance from your elbow to your fingertips (a cubit). So instead of referring to drawing all the way along, you create this as you go along, shaping it with your eyes and brain as you massage it into existence.

This being said, a byproduct is that you can't work ahead of yourself. You can't measure out the ribs before you have a deck to measure them for. You can't do that until you've taken the time to create a deck that is at once has visually appealing curves as well as trying to make it a sleek, swift, wave-riding machine that can also cut through the dawn's still water in the silence. So you might be able to imagine how this journey evolves in the mind and slowly takes over your thoughts. At work I think about the journeys I'll take as well as the next design steps in line. This also forces a slower build and makes you work at the kayak's pace.

Since the last blog post, I have measured the ribs of the finished deck, cut them and prepared them bending. This process involves soaking them for three to four days and I am currently 24 hours into that step. I have had time to make the bending jig, cut out the pieces for the steamboxes and clean up the badly neglected workshop in this time. It's a nice little calm before the fairly intensive session of steam-building to come! More time to devote to dreaming up the rest
of the kayak!


This is me after I measured out the ribs (beam across gun's plus a fist and a half for me) and made temporary ones of wire to figured out the kayak's depth. I am sitting in it checking out how it will feel here. I was pretty stoked on it right away, the foot rest sitting at a perfect height with room to rest and just touch the foot beam and the back rest at the same time. It feels great relaxed but tight enough to brace against the backrest, thighbeam/massik (to be created) and the footbeam in a moment noticed, quite a necessary thing in hairy water AKA the fun stuff.

I'm not really sure yet what perspective I'm writing this blog from. I don't want to be too involved in the technical side because if you want the details, buy the book, it's cheap and better than I could ever be on a blog for that. If you want to know more about it from me, we can talk about that outside the blogosphere, I'd be happy to talk, share and learn! I really appreciate the Greenland community feel, which has already helped me along so much in my progress here. So this blog is becoming more of a technical bulletin for people who want to see a layman's progress in a fun project with insights into the journey involved. I hope I've been able to hint at the joy involved in creation in this post. Here's a picture of a beautifully satisfying lash.


Thursday, September 5, 2013

Shape!

Aloha friends, much has happened and more is about to happen! I have finally put the top deck together, lashing it together with trunnels and all. After much precision work and planing and humming and hawing, I put all the deck beams in one gun'l, and then worked the other gun'l on to it, bending it all into shape and holding it in place with clamps and the end forms before I lashed it all together. Sighting down the center only proved quickly that taking my time had paid off and she seemed as true as true can be!

 It was a very rewarding part of the build, finally being able to see part of the finished product and knowing that it's not going to come undone again. It's only going to get better looking from here on out, hopefully.

It was also a fairly meditative process as well as learning and using some new techniques. I used the Eskimo slipknot (I don't know if that's a racist term here or knot) a two types of lashing that were very similar. Both involve a hole in each piece of wood you're lashing together, be it gun'l to gun'l or gun'l to beam, a series of loops between the two, and hitches to tighten it by compressing the two legs of the loop. Using artifical sinew and clamps to hold the shape, I'm quite confident that the sinew will hold and not stretch for a long time.
Here you can see trunnels, or what's left of them. These are 3/8th dowels that I sawed down the middle of, leaving about 3/8th in the middle, so that it had slotted ends. Put that in a hole through both gunnels, then tap in a wedge of wood to hold shape on each side and boom, you got an old school fastening device working it's magic. The next one is further down so that it goes through different grain and doesn't weaken the first one.
 In this photo you can see that just down from the trunnels is the first lash put in, which held the whole deck together with little strain. The trunnels main purpose I think is to hold the tips together very precisely, because holding the tips perfectly flush is the easiest way to have a symmetrical kayak. I also redid this lash here later, to bring the ends together tighter and make for a quicker craft, hopefully.
Here you can see the lashings on a deck beam. There are ten or twelve of these right now in addition to the end lashings and trunnels which I believe is going to give me plenty of strength and worry-free deck as I move on to the ribs soon.


Shaping up to a real beaut!